Henry's Homemade Formula

Our journey towards adding "real" foods into Henry's Homemade Blended G-Tube Formula

What is an ng-tube?

An ng-tube, or nasogastric tube, is one type of feeding tube that can be used when a person is unable or unwilling to eat orally.  Henry first got an ng-tube shortly after he was born.  The doctors immediately recognized his low tone, but did not know the cause, so were worried about possible infections, or other trauma.  As he was unable to eat on his own, they inserted an ng-tube.

Here is a photo of Henry with his ng-tube, the day after he was born:

Henry has this ng-tube for about 4 days, then we convinced them to remove it and we did a combination of breast-feeding and cup feeding.  As Henry grew, he continued to be unable to breast- or bottle-feed successfully, so when Henry was 8 weeks old we made the decision to have an ng-tube reinserted. The cupfeeding was becoming increasingly difficult – with Henry crying and then falling asleep, all the while we’re trying to feed him enough expressed breastmilk (EBM).

Here’s another photo, when he got his tube back again at about 8 weeks old:

Henry's ng-tube, 8 weeks old

The decision to re-insert his ng-tube may have been one of the hardest decisions Shawn and & I have ever had to make, as it cemented the fact, in our minds, that there was something seriously medically “wrong” with our baby.  Up until this point we were banking on the fact that he would outgrow his challenges.  Our pediatrician kept hoping that as he put on weight his tone would improve, and we placed our faith in this theory to.

A little about ng-tubes:

Ng-tubes are generally considered temporary feeding tubes, to be used for up to 8 weeks.  Having said this, Henry had his for about 8 months, while waiting for his g-tube surgery.  Ng-tubes are often used after surgery, until people can eat on their own again, or in people undergoing cancer treatment who are experiencing a lot of nausea.  I  met one women who needed one when she was pregnant as her morning sickness was so bad she couldn’t keep anything down.

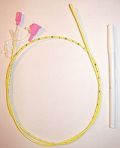
An ng-tube is a thin polyurethane tube, usually with two “ports” at the exterior end and a series of small holes at the interior end.  Here’s a picture of the time of ng-tube Henry often had:

ng-tube

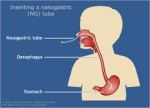
The pink parts are the two ports, this is the end that remains outside the body.  The ports are simply opening through which food, water and/or medications are given to a person. This particular tube is yellow and has measurement indicators marked in black.  The measurement indicators are helpful to ensure the tube is placed within the stomach correctly.  Here is a diagram showing the ng-tube when inserted:

Inserting an ng-tube:

This has got to be one of the worst experiences for Shawn & I.  Inserting a tube in an older child or adult can be an uncomfortable, but relatively simple procedure.  But inserting it into my screaming child has left me with nightmares.  The tube must be inserted through the nose (occasionally through the mouth), and pushed down the throat, passed the vocal cords and into the stomach.  All the while ensuring it doesn’t accidentally go into the lungs.  If the person is able to sit up, position their head properly and take a drink of liquid- the act of swallowing will help pass the tube down the throat and into the stomach.

However, with Henry all bets are off!  From the very beginning he screamed – and rightly so.  We would wrap him up in a blanket to give him the feeling of security, and to hold in his arms and legs.  Early on we decided that Shawn was the “holder” and I was the “pusher-inner” and our roles remain the same today.  Shawn’s job was to hold him as still as possible – especially his head – all the while singing songs, talking, rattling toys… whatever he could do to keep Henry calm.  My job was to insert the tube.

Prior to all of this, we would measure to see what length of tube needed to be inserted to reach his stomach.  To do this, we measured from the tip of his nose, to the middle of his ear and down to midway between his lower ribcage (the lowest centre point) and his belly button.  This was the length of tube needed to ensure the ng-tube would sit at the correct spot inside his tummy.   We used a black felt pen to mark a dot on his tube, so that as I was pushing the tube in, I knew when to stop.

So… Shawn’s holding him down and I’ve got the ng-tube ready to go.  There’s a small amount of water-based lubricant on this end, to help it slide easier.  I push it into and down his nose to the back of his throat.  At this point, there is a small amount of resistance and spinning the tube in my fingers often helps it continue.  However there was one occasion when I couldn’t get it to go any further and I had to remove it and try again.  The tube is flexible, so it if “hits” something it can get stuck.  Then… I just keep pushing the tube in until I come to the black dot that we pre-measured.  Then Shawn would hold it onto his face and used a syringe to draw out some stomach contents.  By using a ph-strip (just like in science class) to test the acid content of the fluid, we knew the tube was in the correct location.  If the ph-strip test was good – then we used a bit of tape to adhere the ng-tube and we were done!

Changing the tube:

We changed Henry’s tube each month.  At first we didn’t learn how to do it ourselves, and needed to go to the Medical Day Unit (MDU) at Children’s Hospital to have it done.  However, it took  exactly one week for Henry to pull out his tube the first time, so we quickly decided we had better learn for ourselves!  From then we changed it at home, but did go back to the MDU a couple of times when we had problems.

Skin care:

This is a very big deal, especially when using an ng-tube for an extended period of time.  The tube is constantly taped to the face, so the skin under the tape can be damaged.  For older kids and adults, round tape “dots” can be used which minimize the surface area on the skin.  However Henry kept pulling his tube out – so we needed some fancy taping!  I’m oddly proud to say that even the nurses at Children’s Hospital used to compliment us on our tape job!

You can see the difference between the tape in this photo, and the previous one.  Just enough tape to keep the tube on, but not a big, wide strip.  Plus an added extra below his nose, as this is where he would hook his finger under the tube and pull it out.

In this photo you can see the redness that develops under the tape.  Each time we changed the tube, we switched sides and inserted it into the other nostril.  This redness would often take over a week to go away.

Possible Problems:

  • nose bleeds – due to the rubbing of the tube.  When using a feeding pump (versus gravity or syringe feeding), the tube vibrates and this can cause chaffing.


  • aspiration – if the tube is inserted incorrectly, or moves due to a fall or being pulled, the end of the tube could go into the lungs instead of the stomach.  Although apparently very rare, and not something we ever experienced, this could cause serious harm.


  • sore throat – from the constant presence of a foreign object.


  • pulling the tube out – something we experienced repeatedly!  Henry seemed to love pulling at the tube, again for obvious reasons… you try having something shoved down your throat and taped to your face!  For the first few months, he was in gloves or had socks on his hands 24/7.  As he got older, we would take the mitts off during the day, but he always wore them when asleep.  Plus he slept on his own little mattress between us in bed for the first year – with Shawn & I both holding onto a hand while sleeping to stop him from rubbing his face.  This was our constant battle and one of the reasons we were so glad to get his g-tube.


  • clogged tube – plugging up the tube is a problem with any time of tube feeding, but especially ng-tubes.  Because they are so thin, it is very important to use lots of water to flush the tube clean.  This can be difficult with small infants, like Henry was, because you don’t want to give so much water that they can’t drink enough breastmlk or formula.  We did clog his tube a couple of times, but each time were able to get it cleared again without having to change the whole tube.
  • public perception – while not really a “problem”, I’ve talked to a number of people who were happy to get rid of the ng-tube so they could go out in public for once and not have people ask what’s “wrong” with their child.  And I agree!  Even really caring, thoughtful people who in no way want to be rude, stare at a baby with an ng-tube.  And it gets tiring… So as horrible as it may sound to someone who’s never experienced it, I was glad to get rid of Henry’s tube… I was glad to stop pretending to myself that people weren’t staring… and I was glad to stop having to explain myself… because not everyone is actually that nice…


Ng-tubes and Homemade Blended Formulas

Because the main purpose of my blog is our experiences with homemade blended foods, I thought I’d include a bit about how ng-tubes work with blenderized diets.  We never tried homemade foods with Henry’s ng-tube.  Well, actually… I guess we did – after all, expressed breast milk (EBM) is the ultimate “homemade” food!  At the time he had his ng-tube, Henry was getting exclusively EBM.  It passed through the tube just fine, and as long as we flushed enough water down the tube afterwards, it didn’t clog.

According to the Homemade Blended Formula Handbook (still my favourite book!), it is possible to augment a commercial formula by adding in some blended whole foods.  But it would be virtually impossible to use an entirely homemade formula – the tube is too thin.  The food would need to be diluted to such a degree it would be impossible to get enough nutrition.  But it’s definitely possible to add in some blended fruits or veggies!


So… that’s my thoughts on ng-tubes.  Both Shawn & I are very thankful the technology exists to allow us to feed our baby. Apparently it was not that long ago that people with ng-tubes had to stay in the hospital – there was no system in place for tube feeding at home.  It was likely one of the most stressful times in our lives – both as individuals and as a couple –  but we persevered and made it through.

We struggled for months with the decision as to whether Henry should have the surgery for a g-tube, but we are most definitely happier now that it’s done… and so is Henry :).

Cheers, Shelley


7 Comments »

Foods high in zinc… important for growth!

In a previous post, I promised I would pass along more information foods high in zinc.  Zinc is mineral important for growth, and one that Henry’s dietician was wondering if he was getting enough of.  Because Henry’s homemade blended food contains both oil and molasses as sources of energy, it is important to ensure that the veggies, fruits, grains and meats included pack a powerful nutritional punch.  He doesn’t eat a huge “volume” of food, so getting a well balanced diet into what he does eat is vital.

At our last check-in with Ali, our “angel” dietician, Henry weight was increasing faster than his height… a possible indication of an under-balanced menu. Thus… she inquired about his zinc intake.

I, of course, had absolutely no idea!

I am a firm believer in the “Grandma-inspired” philosphy of having a colourful plate – if there’s lots of colour on your plate, then bets are you’ve got your nutrition covered (assuming the colour isn’t coming from different flavours of potato chips!).

According to the Dieticians of Canada document Ali sent, zinc is needed in small amount each day for optimum health, and it can be found in a variety of foods.  It also helps the body “use carbohydrates, protein and fat, strengthens the immune system and heals wounds heal”.  Given Henry’s age, he needs between 3 – 7 mg of zinc per day.  The best sources for zinc are seafood, meat, seeds, and cooked dried beans, lentils and peas. Looking at a typical menu for Henry, it seems he may or may not be getting his minimum 3 mg per day.

Here’s an example, using the amounted listed on the “Sources of Zinc” chart from Health Canada:

Grains:

1/2 cup quinoa – not listed on Ali’s chart, but according to another website it is an excellent source of zinc with between 2-2.8 m pg per 1/2 cup

1/2 cup wild rice – 1.2 mg

Fruits:

1/2 cup pears – not listed

1/2 cup banana – not listed

Veggies:

1/2 cup tomato – not listed

1/2 cup broccoli – not listed

*** the only fruits and veggies listed on the Health Canada chart are heart of palm, cabbage and mushrooms

Meat & Alt.

1/4 cup chickpeas – 0.3 mg

1 boiled egg – 0.5 mg

Milk:

1 cup rice milk – 1.1 mg, according to the Ryza package

Oil:

3 tbs olive oil

Extra:

2 tbs molasses


Based on this quick calculation, Henry is getting between 3-7 mg of zinc most days.  However, on days that he doesn’t have any quinoa in his food, he may be falling short.  On these days, it’s important to ensure he has meat – beef or poulty – to make up the shortfall.

All of this just reaffirms my belief that lots of variety is the key.  Henry’s little tummy has difficulty digesting a number of foods, but I still try to squeeze in as many colours as I can!

Cheers, Shelley


Source: Health Canada, “Canadian Nutrient File 2007b”

http://www.wholehealthmd.com/ME2/dirmod.asp?nm=Reference+Library&type=AWHN_Foods&mod=Foods&mid=&id=D18F2C4462B74726B0C2D1FD8A8A65B8&tier=2


Leave a comment »

9.29 kgs & 78 cms!

Yippee!

We met with Ali, the dietician from the Complex Feeding Team at BC Children’s Hospital yesterday and, as usual, the first thing we do is weight and measure Henry, and…

9.29 kgs

78 cm

Yipee!     Yipee!      Yipee!       Yipee!       Yipee!      Yipee!    

This proves it… Henry really can gain weight on his homemade blended food.  We thought we was doing well… he has lots of energy, he’s sleeping well, he’s throwing up less – but this proves it once and for all.  Their highly accurate scale confirms our anecdotal evidence… homemade blended formulas really can work (given the right child and medical situation, of course).   When Henry got sick in August, he lost a lot of weight and went down to under 9kgs… so to see him regain it, plus a little more… it’s what we’d hoped and prayed for.

Just this morning Shawn mentioned in passing that he thought Henry’s face looked chubbier… and it does.  The increase may not seem like much, but given Henry had the flu in August and lost nearly a pound, and had a cold in September and threw up for over a week – this is great!

  • His weight is good – he’s getting back following a lovely 10th percentile curve (let’s face it, chances are he’s not going to be a linebacker with Shawn & I as parents!).
  • His weight for height is improving – his weight is increasing more than his height, which can be a sign of an under-balanced diet.  He’s getting a lot of calories from oils and molasses right now, as that is the easiest way to get calories with little volume, but he also eats about two cups of fruits and veggies a day.  As he can eat more for each meal, I’ll keep increasing the fruits, veggies, grains and meats.  Ali is also going to send along information about foods high in zinc, as this is very important for growth at this age (I’ll post it when I receive it).

You should have seen Shawn & I when he weight was done… we were almost doing a little “happy dance” in the weighting room.  This news is all the more pleasant considering we saw Dr Hadad (our pediatrician) two weeks ago and Henry weighed only 8.81 kgs on his scale.  He was still sick then… but it also shows the discrepancies between scales.  Luckily our scale at home weighed him at 9.3 a couple of day ago… ours is less precise, but just as accurate.

Yippee!!! (and again… and again… and again!)

Cheers, Shelley

4 Comments »

Cloth diapers and g-tubes

Henry’s always worn cloth diapers, since just after he was born. It was a “given” for me that he would wear cloth diapers, and thankfully Shawn readily agreed.  In fact, the engineer in him took charge and before Henry was even born we had comparison charts made of all the various styles and brands!  I could never imagine using disposable diapers all the time – we have a package of “just in case” diapers and have used them on occasion, but for the most part we use cloth 99% of the time (we’ve had the same package of size 3 disposables for almost a year now!).

I feel the need to forewarn you… my feelings about disposable diapers go far beyond the mundane “pet peeve”, possibly bordering on the obsession.  How someone could use exclusively disposable diapers – spending so much money simply to throw away a colossal amount of garbage – I just don’t understand.  Not to mention the proposed health risks of disposable diapers and wipes.  However, from this point forward I will endeavour to remain off my soap-box and dispense with the Rick Mercer style “rant”.

In the end, our cloth diaper search ended with a set of pass-along fitted cloth diapers from a colleague of mine, bolstered by some craigslist finds (indisposable brand, I think).  Paired with some Bummis and AMP covers and our mishmash collection was born.

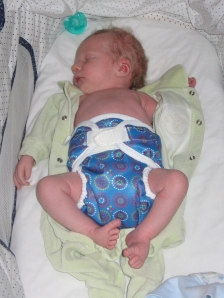
Here’s a photo of Henry wearing one of his first cloth diapers…
Henry's cloth diapers

Henry’s first cloth diaper experience was at about 1 month old (before that he was too small to fit in the one’s we had).  As he grew, his diapers and covers grew with him, and Shawn & I got the hang of washing, drying and folding the diapers pretty quickly.  People (mostly family) used to ask us repeatedly when we were going to “give it up” and use disposables.

“… with everything else going on… I don’t know why to insist on using those things…

But cloth diapers were what we knew, and we found it immensely easier than running out for diapers at night because we’d run out.  Plus, my awesome stubbornness kept us going!

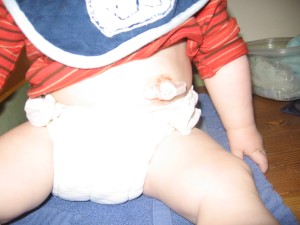
Things went great until Henry got his g-tube – then we hit a bump in the road, so to speak.   With Henry’s new tube, the diapers sat too high up on his tummy and rubbed against the bottom of his tube – a big “no-no”.

Here are some photos…

Henry's g-tube with cloth diapers

As you can see in the top photo, the cloth diaper is sitting right below his tube.  Once the cover is on (bottom photo) it is rubbing on his tube.  The photo is taken with his arm up in the air… when he was sitting normally and playing, the top of the cover pushed the tube up and stretched the skin. 

Because Henry’s diapers sat up so high on his tummy, we had to revert back to using disposables after his surgery.  When he first got his tube, he developed granulation tissue around the site, and while this is normal post-op, the additional rubbing from diapers would only make it worse.  Plus, the g-tube site is an open entry into his tummy – so while it’s not considered a sterile site, it is important to keep it clean… wet diapers nearby are not ideal!

So after a few weeks of recovery (for Henry, and Shawn & I!), I started hunting.  I began my search with an email to several friends (thanks ladies!) asking for advice, and several of them all recommended the same person – Karen from Newandgreen.com.  She was awesome!  Karen started newandgreen.com – an online cloth diaper company – after the birth of her kids.  She is extremely knowledgeable about all brands and styles and immediately offered to help.  Once more… what my friends didn’t know… prior to starting newandgreen.com, Karen worked as an Occupational Therapist, helping many families with children with g-tubes!

Here was a person who knew feeding tubes and cloth diapers!  It was perfect!

We met one morning… she brought a few different styles she thought might work… and within a week we were back in cloth :).   Not only that, she offered us a few “samples” for free to get our new collection started.

Our current system is…

  • Bummis organic cotton prefolds: one of the most economical styles, they are easy to wash & dry, quick to fold and can be used with a variety of covers.  We started off with the infant size even though Henry was older, as they are smaller and added less bulk.  Henry wasn’t walking yet and we didn’t want to add too much bulk or weight.  Now he is larger and stronger, we’re using the baby size – more absorbent so we don’t change him as often.

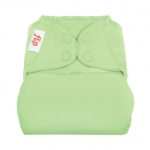
  • Flip covers: a one-size cover that is adjustable from infant to toddler.  We have the front snaps set to the “infant” setting and that keeps the diaper sitting low on his tummy, well away from his tube.  Even with this setting we can use the baby sized diapers and rarely have leaks.  We do need to ensure the diaper is folded narrow enough or he pees straight out the side… diaper is still dry with a puddle on the floor (thank goodness we don’t have carpet!).


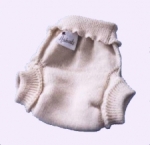
  • Aristocrats Wool covers:  at night we generally use a wool cover, with a cotton prefold inside, attached with a snappi diaper fastener.  Wool covers are extra absorbent and breathable, so great for longer periods of time.  The wool cover does lay on top of his tube, but because it’s so breathable, there hasn’t been a problem.  Most nights we still change his diaper at least once, but we’re also back feeding him once in the evening, after he’s in bed.  There have been nights when we haven’t fed him with no diaper changes (sweet… glorious…sleep!).

So… this is our cloth diaper routine.  It works for us and we couldn’t imagine any other way.  (I will admit, after a few sleepless nights I casually start suggesting we should use disposables over night… but my stubbornness [and Shawn] keeps me in check!).  Henry’s g-tube adds a dimension that many cloth diaper families don’t have, but I still highly recommend to anyone I meet… look into it, cloth diapers can be integrated into any family, it just takes some practice.

If you’d like more information, please email me… I’d be happy to share!  And contact Karen at newandgreen.com – this is a shameless (completely unpaid) plug for her… she was a big help to us and I’m happy to return the favour in any way I can.

Cheers, Shelley

8 Comments »

Traveling with a homemade blended formula (again!)

Our last trip to Texada Island was such a rousing success, we decided to do it again!  Yippee!!!

We packed our car and off we went to Salt Spring Island.  It was a lovely extra-long weekend and even better, the weather held out and we had sunshine for most of the trip… not bad for early October!  The trip was only 4 days, so I decided to try making and freezing Henry’s food in advance, instead of bringing the blender with us.

3 days prior to leaving, I gathered all my supplies and started making batches of food.  I decided to keep it simple and used a standard rotation of food without a lot of variation.  This was partly because it was easier given the number of batches I hoped to make, and partly because Henry was still throwing up a bit from his cold, so I wanted to use only foods he was very well accustomed to.   I prepared all the foods in advance – so had rice, quinoa, boiled eggs and chickpeas already made, plus fruits and veggies washed.  Shawn was home and had been enlisted to help wash & slice, and entertain Henry in the other room when the blender was on (still my main pet-peeve about the Vitamix blender… too loud!).  My goal was to make a minimum of 7 batches; enough for our trip, the day after we returned and two spares in case jars broke in the freezer.

Side note… canning jars normally shouldn’t break when frozen, unless filled too full.  But I have had several break, even when only filled half-full.  I think this might be because I got lots of hand-me-down jars from my step-mom and mother-in-law.  These jars are well over 30 years old, so may already have very small hairline cracks forming that can’t be seen yet.  But when frozen, the pressure breaks them.  I have several new jars of various sizes and none of them have broken when frozen.  I don’t know for sure this is the answer… but having asked around, it is my best somewhat-educated guess.


I felt like I was part of a science experiment gone wrong!  There was food everywhere… bowls piled on top of bowls, cutting boards dangling precariously off the edge of counters, and more food on the floor than in the blender… or at least that is how it appeared to me!  I’m a messy cook by nature (okay… maybe I’m just messy) and given the amount of food being sliced and measured, it was a catastrophe waiting to happen.

Henry was kept busy picking up all the food I dropped on the floor – luckily for me he’s fully into his “help mama” stage and loves doing clean up :).  What a great stage… I hope it last very loooooong time!  I’ve read other blogs where people routinely make multiple batches of food at one time… what a great skill to have, but sadly not one I have current attained.  :(.  I still find that if I make 2 batches at once it takes well more than twice as long!

Oh well… enough about abhorrent cooking skills (if more info needed… talk to my hubby!), in the end I had 6 lovely batches of food in the freezer and one in the fridge.  Miracle of miracles, not a single jar broke so we set.   On the day we left, I packed 6 quart-sized jars from the freezer, 8 500 ml jars from the fridge, plus some snacks into the cooler and they all stayed nicely cooled until we arrived on Salt Spring Island.  So cooled, in fact, that all the jars from the freezer were still completely frozen.

So far, so good… maybe next time we’ll travel by plane!  (am I nuts????)

Cheers, Shelley

Leave a comment »

Car Sickness

I think Henry’s starting to get car sick. As he’s always been a “puker” it’s tough to say for sure, but it wouldn’t surprise me.  We noticed several months ago that he seemed to get sick in the car a lot, but as throwing up wasn’t unusual for him, we didn’t think much of it.  But lately, even though his vomiting is becoming more under control, he continues to get sick in the car and it’s happening with increasing frequency.  Plus, he’s getting sick in the car at times when he isn’t throwing up anywhere else.  I read that car sickness tends to run in the families and since Shawn still feels car sick at times (his excuse for always wanting to drive!), it would make sense that Henry might too.

Risk factors for car sickness may include age (children ages 2 – 12 are most likely to get motion sickness), being prone to nausea or vomiting, sitting in the back seat and higher level of fear or anxiety.  Dizziness, fatigue and nausea are the most common symptoms of motion sickness.

So… being the researcher that I am, I started looking for car sickness remedies.  I can’t vouch for any of these personally, as I’m only beginning my search, but this is what I’ve found so far.


Things that can help alleviate car sickness include…

  • Look out the front window. Watching the passing scenery can confirm your balance system’s detection of motion and help resolve the mismatch that causes car sickness. Focus on a non-moving object in the distance, such as the horizon. Don’t do anything that involves focusing on a fixed spot, such as reading or playing a card game. Don’t turn around or look from side to side much.
    • we moved Henry’s car seat so that he facing forwards now, and positioned it in the middle of the backseat, so he can see out the front window.


  • Open the window. Many people find that smelling fresh, cool air helps make them feel better, although the reason behind this isn’t clear.

  • Take breaks. Go outside to stretch your legs. Sit on a bench or under a tree and take some deep breaths in through your mouth, breathing deeply from your stomach to help relax. This is especially important during journeys that involve a long distance of curvy roads. Not only does stopping frequently help alleviate car sickness, but it is also good for the driver to take a break.


  • Practice acupressure. If you feel that you might be getting car sick, apply gentle pressure between the two tendons about 3cm (about an inch) or so back from the wrist joint. You can also purchase a wrist band that will do this for you.[2] This should temporarily delay or alleviate nausea until you can take a break from the trip. You can also purchase accu-pressure bands at a local pharmacy.

  • Take steps to prevent nausea. Since nausea is the most debilitating symptom of car sickness, it’s always good to take precautionary measures.
    • Ginger root is a classic remedy because of its widely recognized nausea-preventing effects.
    • If you are traveling a long distance, you could also consider taking ginger tea in a thermos. Peppermint tea is another good alternative. Cold drinks could include ginger ale or ginger beer (soda).
    • Fresh mint can also cure or alleviate nausea.
    • Keep a peppermint candy (or just about any long lasting hard candy) in your mouth. This method will work very well even after feelings of nausea have begun. Do not chew the candy because feelings of nausea may return fairly quickly after the candy is gone. For those whose nausea is worsened by the smell or taste of peppermint, lemon drops may prove helpful.
    • Rubbing alcohol wipes are useful as well for nausea.  Tear open a wipe and sniff gently as you pass it past your nose. This works very well
    • Listening to music can help keep your mind off the sickness.


  • Close your eyes. Sleep if you can. If your eyes are closed, you don’t see anything, and that removes the cause of motion sickness. In addition, sleeping can take your mind off of your car sickness.

  • Use medication that prevents car sickness. There are over-the-counter and prescription drugs that are effective against car sickness. Most of them contain dimenhydrinate,[3] meclizine[4] or scopolamine.[5] Some popular brands are Dramamine and Bonine/Antivert. Look into the side effects before using any of these drugs (especially if you’re driving), and ask your doctor just in case. Some of these are available as patches and can be particularly helpful. Antihistamines can prevent nausea caused by motion sickness by dulling the inner ear’s motion sensors. This medication is able to block the part of the brain that controls nausea and needs to be taken before motion sickness occurs. Antihistamines can make you feel sleepy and affect your ability to operate machinery.

  • Sit in the front and/or as close to the middle as possible. Consider driving (if possible). Drivers rarely get car sickness as they are always focused on the road. Sitting in the passenger’s seat up front is the next best thing. Not only will you have more window space to look through, but in some cars, the ride tends to be less bumpy in the front. If driving is not possible or desirable, visualize driving or pretend you are driving. This can often prevent or alleviate nausea.  Sitting in the middle of the car can help too, as this helps to reduce movement.
  • There are many “folk remedies” which seem to work for some people, but can’t be explained and haven’t been proven. If all else fails, it might be worth giving them a shot:
    • Try smelling newspaper. Since reading the paper will probably make you sick, just have it close to you in the car. If you don’t always have a newspaper handy, many art supply stores sell pads of newsprint (which smells the same) that you may put in the car.
    • Eat a dill pickle before and during a trip could prevent feeling sick.
    • Wrap a rubber band around your wrist. You can also purchase motion sickness wrist bands; some contain medications, some do not. In theory, the tightness of the rubber band will provide a distraction from the nausea.
    • Chew gum.
    • Eat saltines or other slightly salty snacks.
    • Placing a plaster over the belly button.
    • Keeping your head in continuous contact with the seat or window.
    • Listen to music (with earphones), use MP3 player or a kind of. This is helpful to manipulate inner ear to brain information which usually cause nausea. Your favorite music will manipulate the information become something amuse, so that car sickness can be avoided. And you know what, it works.
    • Don’t shake your head.


If anyone has any other suggestions that may help, I’d love to hear them!!!


Hopefully Henry’s car sickness doesn’t continue to get worse.  It would be great if it went away completely, but let’s be realistic… vomiting is a constant joy in our lives, and this ain’t changing anytime soon!


Cheers, Shelley

Sources:

http://www.wikihow.com/Avoid-Car-Sickness

http://en.wikipedia.org/wiki/Motion_sickness#Carsickness_or_Car_sickness

http://www.umm.edu/altmed/articles/motion-sickness-000110.htm

http://kidshealth.org/kid/talk/qa/motion_sickness.html#

http://www.thetravelfiles.com/articles/114

Leave a comment »